
How to Create a Live Backup Copy of Virtual Machines While Running
Introducing the BackupChain®: Backup Software and Toolset Made for IT Professionals
 This article outlines how to live back up virtual machines while running without interrupting them. Live backup means that the operating system, applications, or any other services running on the physical or virtual machine will not be interrupted or paused. Live backup is absolutely crucial for production systems and BackupChain contains specialized technology to ensure that all your live backups are consistent and do not interfere with the services provided by your VMs.
Setting up a backup task in BackupChain with incremental and differential deduplication takes just two minutes, and is outlined below.
BackupChain offers virtual machine live backup for various platforms:
- Backup virtual machines running on Hyper-V (Windows Server 2025 – 2008 or Windows 11 – 8 hosts, any guest OS)
- Backup virtual machines running on VMware Workstation, VMware Server & VMware Player
- Backup virtual machines running on VirtualBox
- Live backup for physical servers, live file server backup, and live NAS backup
Check out the step-by-step for the respective platforms linked above. BackupChain’s feature “Single Click Backup” automates the steps below for Hyper-V backups.
See it in Action: Automated Hyper-V Backup (Full, Incremental, Differential)
Step 1: Create a New Task for Live Backup
Create a new task and select the type of virtualization platform you are using. In our example, we’ll use VMware. For a walkthrough for Hyper-V Servers, click here. The steps for Microsoft Virtual Server and Oracle VirtualBox are the same as shown in this example walk through.
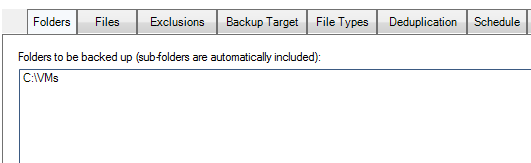
Step 2: Select Folder Containing VM Files
Create a new task and select the folder containing your image files (.VHDX, .AVHDX, .VHD, .AVHD, .VMDK, etc.) Hint: click on images to zoom in.
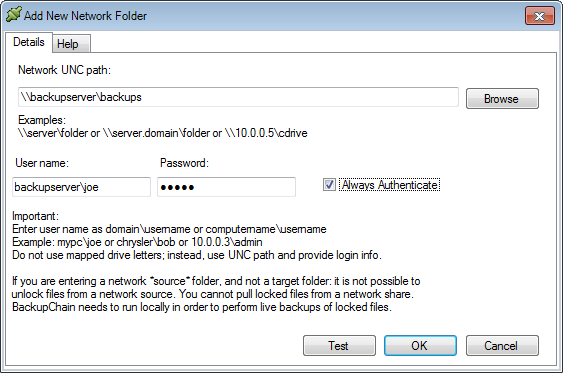
Step 3: Select a Target Folder
Proceed with the New Task Wizard to the point where you specify the target.
You can either store your backup locally, on an external drive (USB), on the network via a network share, or to an FTP/FTPS location. In this example, we chose a network share target on another NAS server:
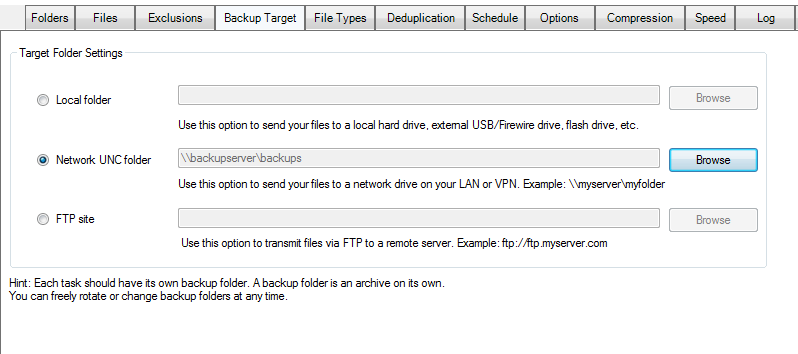
Once saved, the setting should appear under the Backup Target tab:
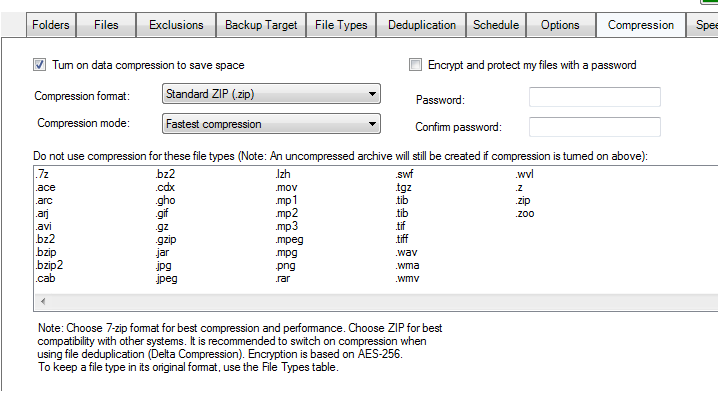
Step 4: Enable Compression and Encryption for Your Live Backup
Because VMs generally compress well, it makes sense to turn on ZIP compression.
The Delta Compression (deduplication) algorithm will not compress the inner blocks of files unless this setting is checked. Note: the delta algorithm will only save compressed blocks
if they actually compress to a smaller block length than the original. This feature helps you save even more space and restore time.
Turning on encryption and entering a password will protect your files using military strength encryption (256 bit AES):
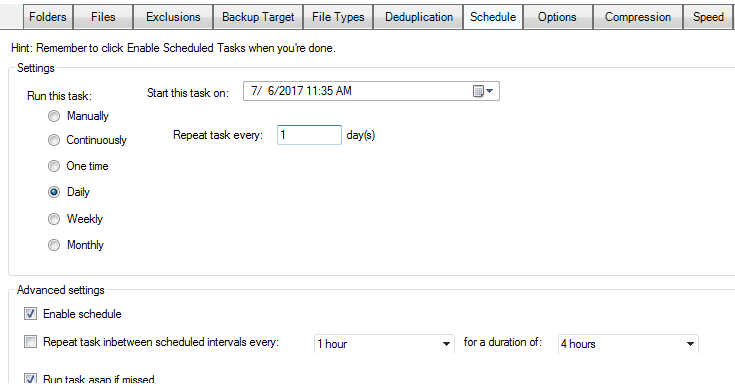
Step 5 (optional): Set Schedule Options
Now you’re ready to start the task. If you want to schedule it to run repeatedly, you can switch to Continuous, Daily, Weekly, Monthly, or other scheduling modes.
The following illustrates a sample configuration to run on selected months, on the first Sunday.
Congratulations: Your Live Backup is Complete!
We hope this walk-through illustrated how simple it is to create an automatic live backup task using BackupChain Backup Software. Because this tool saves you storage space and time, it is well suited to serve as a remote backup software for your servers.
The file-based procedure shown above in this article is the same for all host platforms.
See also
Hyper-V Backup Using BackupChain®
VMware Backup Using BackupChain®
VirtualBox Backup Using BackupChain®
This online backup tutorial article explains how to set up the integrated FTPS Server and protect files and VMs over the Internet.
Please email us your support requests, questions, and comments to: support@backupchain.com