

Step By Step Instructions for Centralized Management Console / Dashboard
In order to set up remote management you need to decide which topology you want to use. You can have nodes connect to the controller console or the controller connects to the node, or combination of both methods.
Setting up the Centralized Console
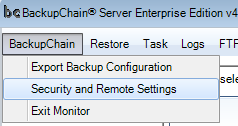
From the main menu, open Security and Remote Settings:
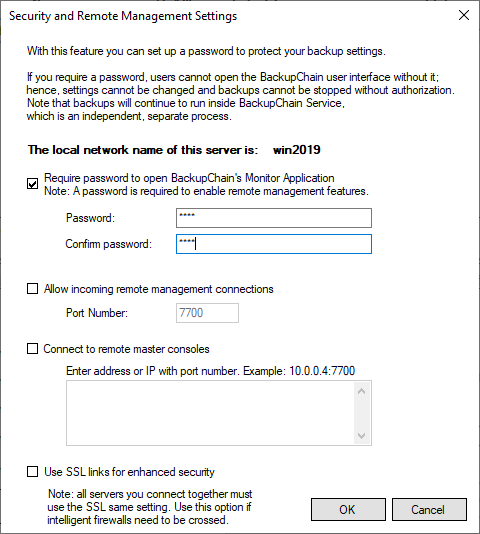
In the screen that opens next you must set a password:
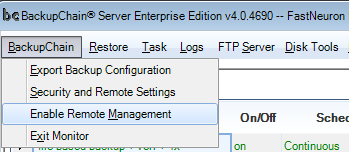
Once you set up a password (at the very least) you can click OK and then go back and Enable Remote Management:
In order to allow nodes to connect to the controller server, you need to open the Security and Remote Settings screen and check “Allow incoming remote management connections” on the controller computer. You also have to specify a TCP port number. In our example above it’s 7700.
The SSL option should be checked if any remote management link will go through an intelligent firewall system or the internet or other public networks. Otherwise, firewalls might misinterpret the traffic as malicious and abruptly break the connection. The standard Windows Firewall, however, will work fine without the SSL option and requires no further configuration.
Adding a Node Server
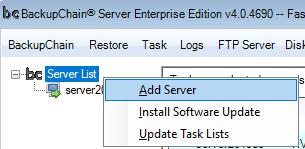
Once you have enabled remote management by clicking on the option in the main menu (after having set up a password as described above), the main screen will split vertically. You will see a server tree on the left with the local host being already added below. Then right-click on top entry “Server List” and select “Add Server”:
On the screen that follows you can enter the node’s details:
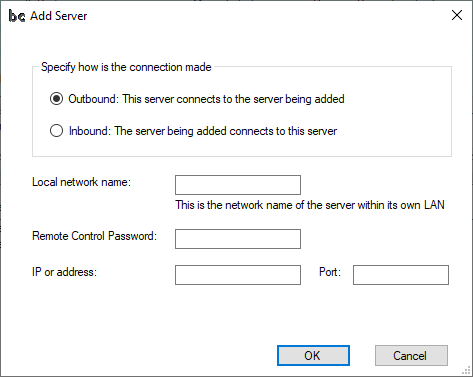
Here you need to specify if the node will connect to this controller server (inbound), or whether the controller is supposed to connect to the node (outbound).
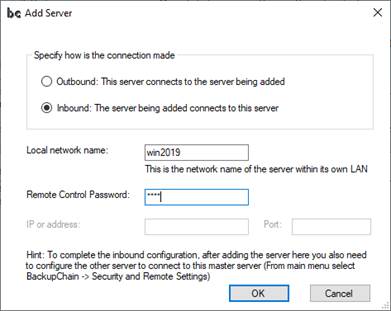
For the inbound scenario where the node connects to the controller, you must provide the local network name and the remote control password. The password you enter here is the one you defined in the node’s “Security and Remote Management “configuration screen. Hence, the controller can only control the node if the controller knows the node’s password as well as its network name; this is how trust is being established.
Setting up Inbound Connections (Controller Receives Link from Node)
When you add the server in the controller screen by right-clicking on “Add Server”, enter the network name and password exactly as it appears in the Security and Remote Management Settings of the node.
Click Add Server:
And on the controller side you enter:
Based on the node’s settings shown below (note the screen displays the network name “win2019”):
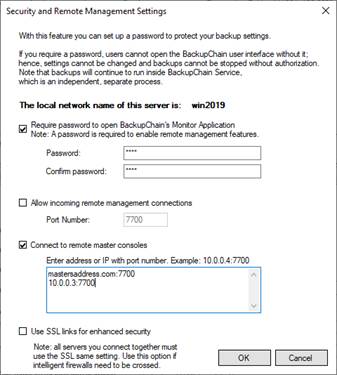
Also note, the node has a password defined and the option “Connect to remote controller consoles” checked. In our example, this node connects to two controllers. One controller is at controller-domain.com:7700 and the other is a local controller at 10.0.0.3:7700. The port number is 7700 and appears after the semicolon.
In the controller’s Add Server screen we need to enter the network name “Win2019” so that the incoming connection can be matched to the password of that particular node, which also has to be entered in the same screen. Only then the two can talk together.
Setting up Outbound Connections (Controller Connects to Node)
In this example, we set up the same node to be receiving the controller ’s connection instead. From the controller’s perspective it’s an outbound connection. For the node it’s therefore an inbound connection. Hence, we need to “allow incoming management connections” and we choose port 7700 as shown below:
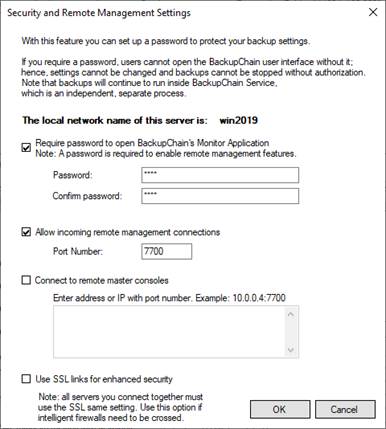
All we need to do at the node side is to set the password and allow incoming remote management connections.
On the controller we need to configure the node and tell the controller to connect to the node, which is an outbound connection:
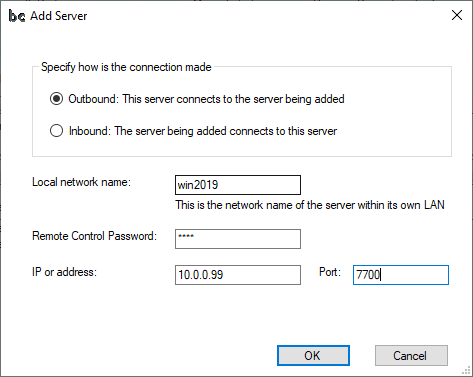
Note that here we must provide the local network name for identification purposes, the remote management password entered in the previous screen on Win2019, and the address or IP address of Win2019 and port number, which in our example are 10.0.0.99 and 7700, respectively. These settings tell the controller where the node is, what the password is (to establish trust), and that we want the controller to connect the node (outbound); hence, we have to provide the address of the node (10.0.0.99 or network name on LAN) and the port number.
Managing Remote Servers
Once the remote server is added, you can see all tasks of all servers listed one underneath the other by selecting the top entry “Server List”. By right-clicking on a particular server, you see additional actions available for each server:
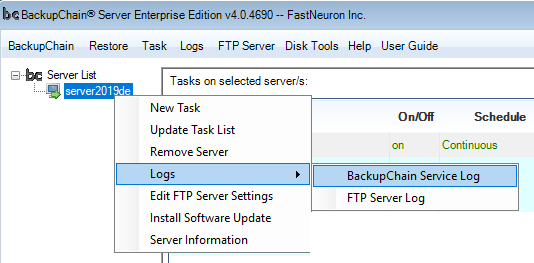
“New Task” creates a new task on the selected server.
“Update Task List” requests an up-to-date task list from the server. The controller already periodically makes such requests automatically; however, with this function you can force it to occur immediately.
“Remote Server” removes the server entry from the tree.
“Logs” allows you to load on of the remote server’s main service logs.
“Edit FTP Server Settings” opens the FTP settings at the remote server site.
“Install Software Update” opens the Software Installation Screen where you can remotely update the software of all or selected connected servers.
“Server Information” displays additional server details of the connected server.
Restoring Files on Remote Servers
In order to start a restore process, you need to log on to the server where the restore process is supposed to run. Note, however, that in LAN environments you can use UNC paths as targets, with document based backups; i.e. you can run the restore process on any server via UNC and pull backup files from another server, and also write the restored data over UNC to any other server. While all kinds of backup tasks can be restored from UNC, restoring to UNC paths may only be done for documents and offline virtual disks. Note that VMs cannot be integrated automatically into Hyper-V Manager over the network. For VMs to be added back into the Hyper-V Manager, you need to run the restore locally on the server that is to receive the restored VM.
Managing Backups on Remote Servers
You can manage backups on remote servers from the controller server as if you are connected locally. Folder, file, and physical disk selection is passed through as if it were local.
The time in the log view is displayed in the local time zone of the viewer. If your remote servers are in a different time zone, the time shown in the time column is adjusted automatically.
Note that the refresh of remote server backup progress will be slower than that of the local server. Also there may be a delay when you request certain operations, due to the packet roundtrip time to and from the destination. It may take a few seconds before the remote server reacts to a particular command, depending on link conditions and distance.
Backup Software Overview
The Best Backup Software in 2026 Download BackupChain®BackupChain Backup Software is the all-in-one Windows Server backup solution and includes:
Server Backup
Disk Image Backup
Drive Cloning and Disk Copy
VirtualBox Backup
VMware Backup
FTP Backup
Cloud Backup
File Server Backup
Virtual Machine Backup
Server Backup Solution
Hyper-V Backup
Popular
- Best Practices for Server Backups
- NAS Backup: Buffalo, Drobo, Synology
- Cloud Backup Solution for Windows Server
- DriveMaker: Map FTP, SFTP, S3 Sites to a Drive Letter (Freeware)
Resources
- BackupChain
- VM Backup
- Knowledge Base
- BackupChain (German)
- German Help Pages
- BackupChain (Greek)
- BackupChain (Spanish)
- BackupChain (French)
- BackupChain (Dutch)
- BackupChain (Italian)
- BackupChain is an all-in-one, reliable backup solution for Windows and Hyper-V that is more affordable than Veeam, Acronis, and Altaro.