

How to Convert a Physical Machine into a VMware Virtual Machine
For detailed product information, please visit the BackupChain home page.
Setting up the VM on hypervisors other than Hyper-V is very similar.
Note, this step only needs to be done once. Once you have the VM in place, BackupChain can replace the virtual disk in subsequent backup cycles automatically. When you need the VM in a disaster recovery scenario, simply boot it up and it’s immediately ready to go.
You basically create a new “dummy” VM that points to the virtual disk. If EFI is necessary you need to turn it on in the VM settings.
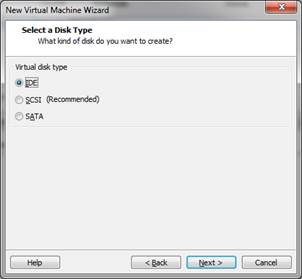
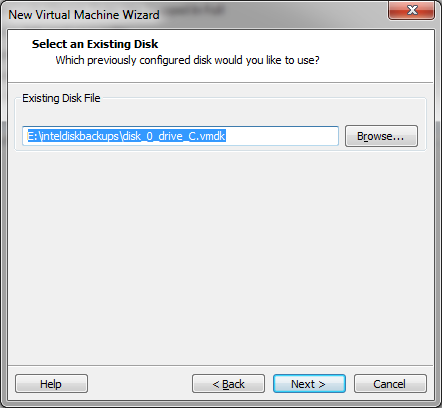
Note: Always attach the virtual disk to an IDE controller first.
In VMware Workstation, create a new VM:
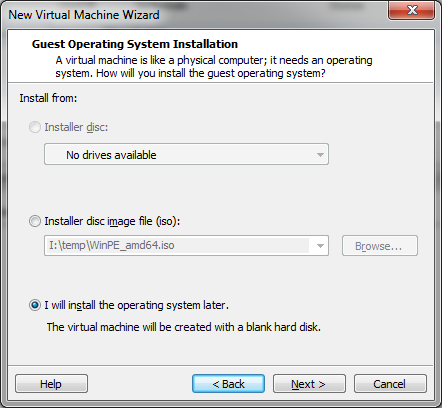
Skip the OS installation, and select a guest OS for hardware compatibility:
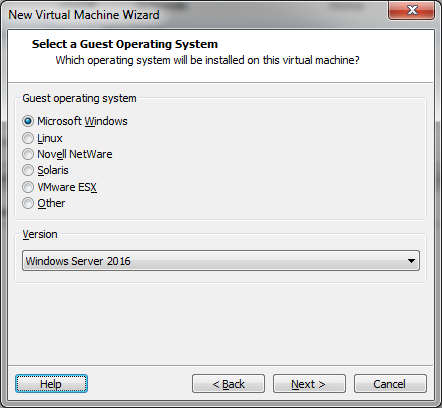
Then name the VM in the following screen and select the appropriate BIOS
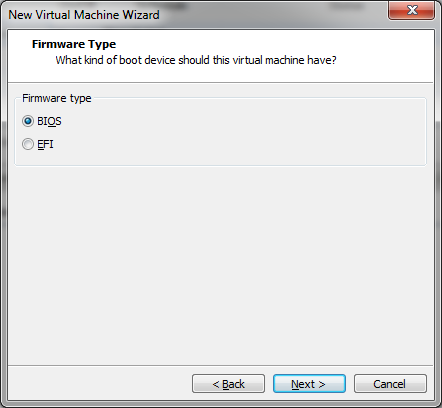
Unlike Hyper-V, you can change this BIOS setting later if need be. Then skip through the next pages, assign LAN and memory and attach the virtual disk to an IDE controller:
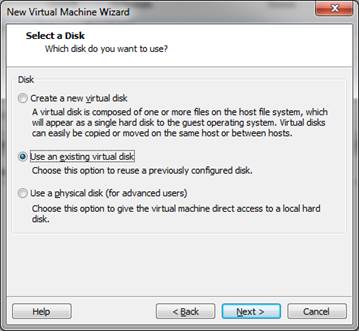
Then select “use an existing disk”
And select the virtual disk created by BackupChain:
The VM is now done and may be booted. In case the VM boots with BSOD you may need to change the boot settings as explained in the section above, page 144.
Backup Software Overview
The Best Backup Software in 2026 Download BackupChain®BackupChain Backup Software is the all-in-one Windows Server backup solution and includes:
Server Backup
Disk Image Backup
Drive Cloning and Disk Copy
VirtualBox Backup
VMware Backup
FTP Backup
Cloud Backup
File Server Backup
Virtual Machine Backup
Server Backup Solution
Hyper-V Backup
Popular
- Best Practices for Server Backups
- NAS Backup: Buffalo, Drobo, Synology
- How to use BackupChain for Cloud and Remote
- DriveMaker: Map FTP, SFTP, S3 Sites to a Drive Letter (Freeware)
Resources
- BackupChain
- VM Backup
- Knowledge Base
- BackupChain (German)
- German Help Pages
- BackupChain (Greek)
- BackupChain (Spanish)
- BackupChain (French)
- BackupChain (Dutch)
- BackupChain (Italian)
- BackupChain Server Backup Solution
- BackupChain is an all-in-one, reliable backup solution for Windows and Hyper-V that is more affordable than Veeam, Acronis, and Altaro.