

How to Convert a Physical Machine to a Virtual Machine P2V on Hyper-V
For detailed product information, please visit the BackupChain home page.
To convert a physical server to a virtual machine you can either create a new disk backup task (see page 29) or use the Disk Converter tool (Main menu -> Disk Tools->Disk Backup & Disk Converter).
For each physical disk you need to convert, you would enter the following conversion steps. In the example below we have only one disk, which is disk #3 and holds drive letters Z:, F:, J:, D:, and V: with an overall capacity of 7.28 TB:
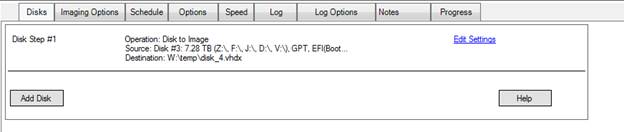
Click ‘edit settings’ to see the detailed settings for that backup step:
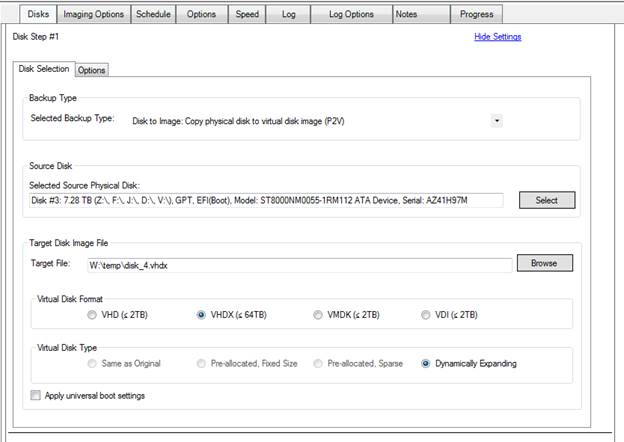
To get to the above screen, either open the Disk Backup & Disk Converter from the main menu, or click “New Task” and create a new sector-level disk backup task. Then select “source is a physical disk” as shown above and click the “select” button to view all available disks.
Note: Dynamic disks must be converted all combined in one step by adding additional disks to the above screen using the Add Disk button. Dynamic disks in Windows (not to be confused with expanding virtual disks, see https://technet.microsoft.com/en-us/library/cc737048 for a definition) allow spanned, striped, and mirrored volumes that may span several disks. If you want these disks imaged you must select all of them to be converted simultaneously. You can add additional conversion steps (i.e. disks) by clicking the “Add Disk” button.
Note there are three basic settings to be filled out in the above screen:
1.Backup type: in this case “Disk to Image”
2.The source disk: “disk #3”
3.The target image file: “W:\temp\disk_4.vhdx”
The above example converts the physical disk to a disk image file “disk_4.vhdx”. The VHDX virtual disk format can grow up to 64 TB, whereas all other formats are limited to about 2 TB. Depending on your virtualization platform of choice you may want to choose:
|
VHD |
Windows Server 2008 or Windows 7 and later Example: Hyper-V or Virtual PC |
|
VHDX |
Windows Server 2012 or Windows 8 and later Hyper-V |
|
VMDK |
VMware Workstation, Server, ESX, ESXi |
|
VDI |
VirtualBox |
Note that some later versions of VirtualBox and VMware may be able to use VHDs as well.
If you are backing up the disk for the purposes of disaster recovery, as long as the disk is under 2TB you could use any format. Performance is best with the VHDX format, however.
The virtual disk type is preset to “dynamically expanding” which means the virtual disk will grow to accommodate all data on the original drive and will use only as much storage as necessary to hold all information.
The tab “Options” provides additional functions to fine-tune your disk backup.
“Prepare all services for backup” provides application consistency by notifying all VSS aware services to prepare for live backup. Use this option especially when you have Microsoft SQL Server, Exchange Server, Oracle (VSS aware versions), and other VSS aware services running.
“Skip disk space marked as free” instructs BackupChain to skip those file system blocks that are specifically marked free by the operating system.
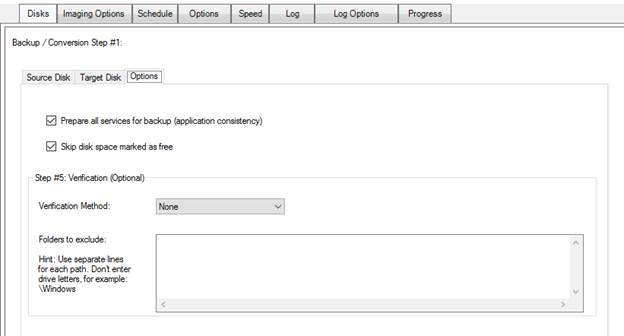
At the bottom of the above screen you also have the option to use verification. BackupChain will perform the full conversion and then verify file by file if requested. You can exclude certain folders from being verified by entering them without a drive letter, such as:
\temp
to skip all temp folders on the root folder.
Automatic cleanup of old virtual disk backups
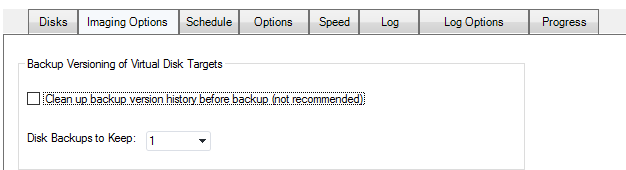
In the case of virtual disk targets you can control how BackupChain deletes old backups in the Imaging Options tab. The option “Disk Backups to Keep” determines how many versions you want to have in the backup target folder. “ALL” keeps them indefinitely (not recommended). You can enter any number as needed.
Note the option “clean up backup version history before backup” will allow BackupChain to delete the oldest backup before starting the new backup. This is not recommended in the case of keeping just “1” backup in the history because if the backup is stopped or fails, you will be left with no backup at all.
The default strategy in BackupChain is to always ensure you have at least one good backup under all circumstances; however, in some settings available backup storage is very limited and the cleanup option may be the only way to get backups to work at all.
Booting the virtual disk as virtual machine (P2V)
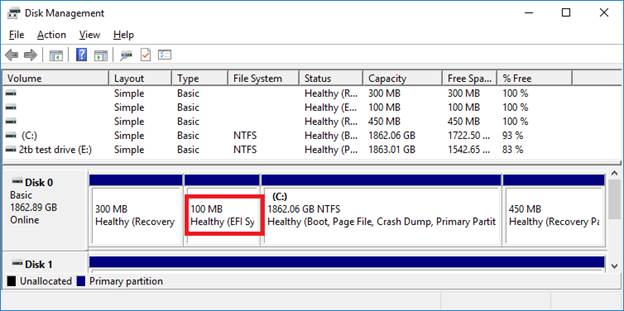
Please familiarize yourself with the nature of the server’s disk layout before continuing with P2V. Open the Windows Disk Management via the Control Panel and have a look at the boot partition.
The example below shows the system drive Disk 0 is a Basic disk (hence it may be backed up by itself in isolation) and uses an EFI boot loader, which is common on newer hardware:
A system without EFI boot loader would look as follows:
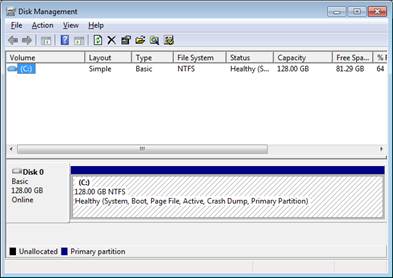
Note that EFI boot is not supported on some virtualization platforms. EFI / UEFI can be booted in Generation 2 VMs in Hyper-V Server 2012 R2 / Windows Server 2012 R2 and later. If you want to convert a physical server/PC and run it as VM on earlier versions of Windows, such as Windows Server 2012 or 2008 R2, it would need to have a regular boot loader without EFI.
Note: EFI bios is implemented in VMware Workstation and in VirtualBox as well.
Create a P2V VM on Hyper-V
Note this step only needs to be done once. Once you have the VM in place, BackupChain can replace the virtual disk in subsequent backup cycles automatically. When you need the VM in a disaster recovery scenario, simply boot it up and it’s immediately ready to go.
As mentioned above, if your physical machine uses EFI and you wish to use Hyper-V to run the VM, you have to use Windows Server 2012 R2 or later. In this example we will create a Generation 2 VM in Hyper-V:
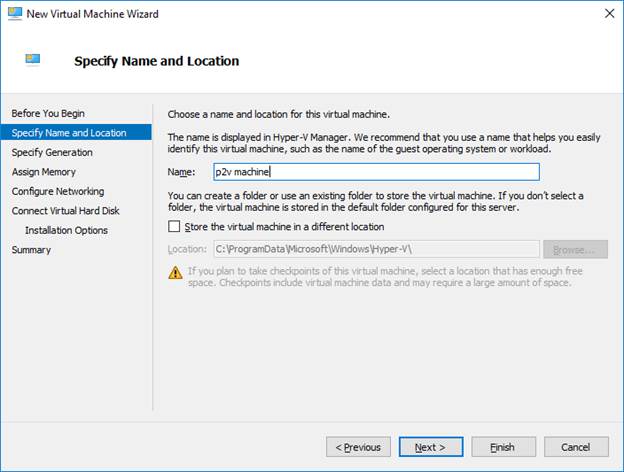
Enter name and click “next”:
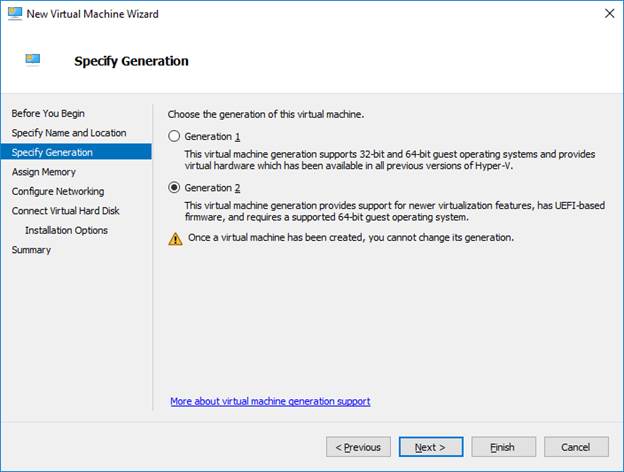
Select “generation 2” if you need EFI. Note that Hyper-V only supports SCSI controllers in generation2 VMs. Depending on your physical server configuration this may require a change in boot configuration.
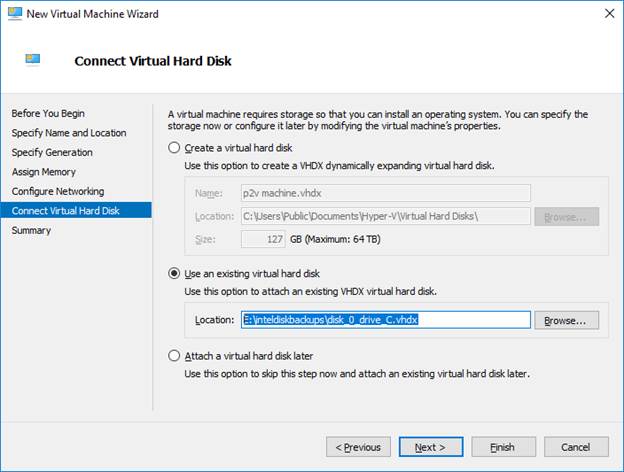
Then click Next set a reasonable amount of RAM, disconnect the LAN for now, and in the screen “Connect virtual hard disk” select the VHDX create by BackupChain, see example below:
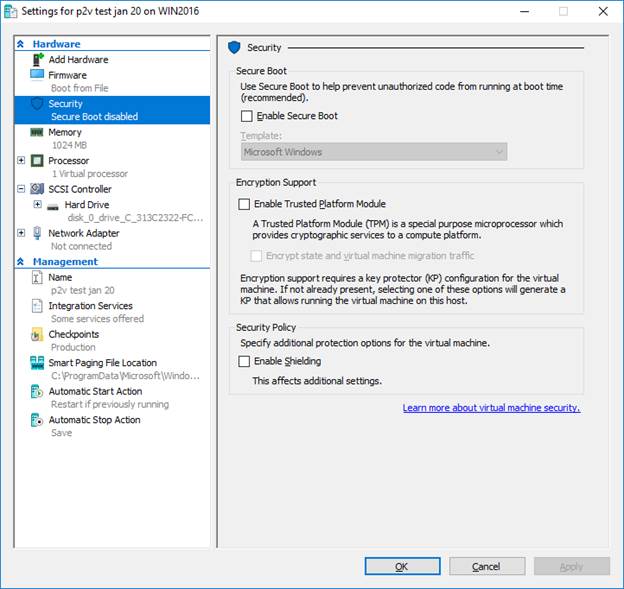
Then click finish. In the specific case of “generation 2” VMs we need to change the VM settings one time.
In the security settings, disable secure boot, shielding and TPM:
And the firmware section should point to the Windows boot manager on disk:
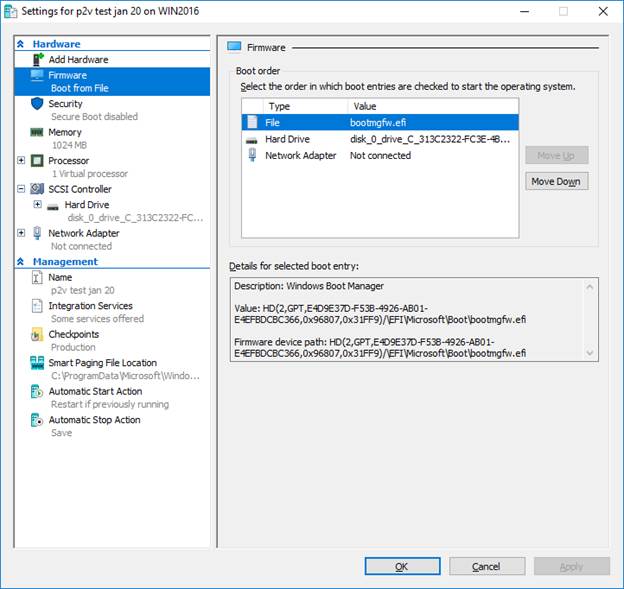
The VM is now ready to boot. In case the VM boots with BSOD you may need to change the boot settings as explained below:
Changing VM Boot Settings
For some physical machines, depending on their operating system and boot configuration, you may need to prepare the VM’s boot settings by using the “Disk Preparation Tools” in BackupChain:
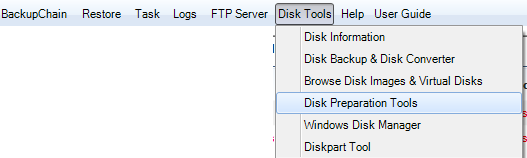
Open it via the main menu as shown above.
Then select the virtual disk file, click “configure universal boot settings”, and click OK as shown below:
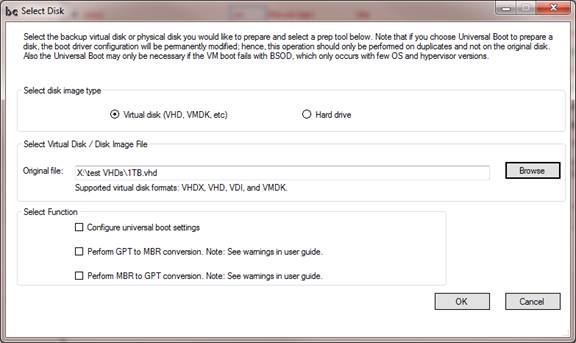
Note: if you had copied the physical server to another physical disk instead of a virtual disk, you could now select the backup physical disk to be prepared (grayed out option above). You would use this feature if you wanted to move the disk to another physical machine or if you wanted to attach the physical disk to a VM and boot from it.
After this process is done, the VM’s boot configuration is altered to permit IDE boots as well. This is necessary especially on older virtualization platforms, such as Hyper-V on Windows Server 2008 R2 or VMware Workstation without the EFI bios option enabled.
Note: Unlike Hyper-V, VMware Workstation and ESX allow running the VM off an IDE controller even when the EFI option is ON.
Backup Software Overview
The Best Backup Software in 2026 Download BackupChain®BackupChain Backup Software is the all-in-one Windows Server backup solution and includes:
Server Backup
Disk Image Backup
Drive Cloning and Disk Copy
VirtualBox Backup
VMware Backup
FTP Backup
Cloud Backup
File Server Backup
Virtual Machine Backup
Server Backup Solution
Hyper-V Backup
Popular
- Best Practices for Server Backups
- NAS Backup: Buffalo, Drobo, Synology
- How to use BackupChain for Cloud and Remote
- DriveMaker: Map FTP, SFTP, S3 Sites to a Drive Letter (Freeware)
Resources
- BackupChain
- VM Backup
- Knowledge Base
- BackupChain (German)
- German Help Pages
- BackupChain (Greek)
- BackupChain (Spanish)
- BackupChain (French)
- BackupChain (Dutch)
- BackupChain (Italian)
- BackupChain Server Backup Solution
- BackupChain is an all-in-one, reliable backup solution for Windows and Hyper-V that is more affordable than Veeam, Acronis, and Altaro.