

Creating Disk Backup Tasks: Disk Imaging, Cloning, Restoring Images
For detailed product information, please visit the BackupChain home page.
This section explains how to back up, copy, or convert entire disks using a “disk to image backup” task. If you want to back up file server documents, virtual machines, or databases, please refer to the next section: “Create a New Task” on page 46.
Definition of terminology
This manual uses the terms “conversion”, backup, and copy interchangeably. Physical disks are converted to other physical disks or virtual disks. A conversion is similar to a copy and can be used as a backup image file that you can use to restore the entire system from. Copying from disk to disk may include additional operations beyond the straight copy and is hence more of a conversion than a true copy.
Windows requires all mounted physical disks to have unique identifiers. Copying disks on a live system, hence, requires that the “copy” must be assigned a new identity before it can be mounted. BackupChain takes care of this issue so that Windows permits the original and the “clone” to coexist side-by-side without clashes. However, BackupChain performs some modifications on the target disk in order to achieve this. If you are using a 3rd-party boot loader, other than the standard Windows boot loader, the cloned disk might, if it is a Windows operating system boot disk, not boot correctly.
Getting started
To create a new disk backup task, click “New Task” from the main window, select “disk to image backup” and enter a task name:
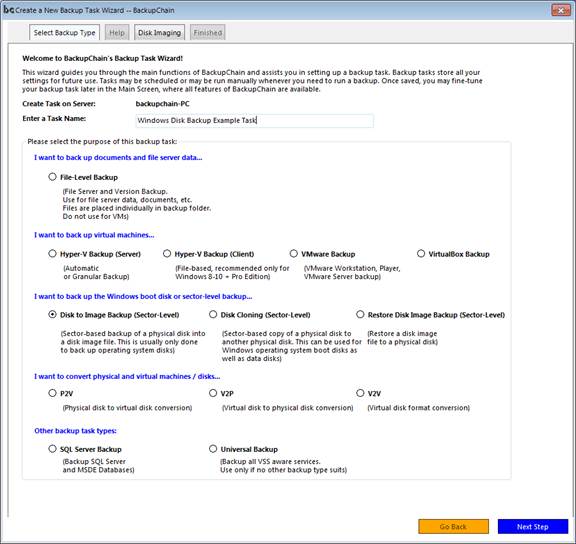
Then click “Next Step” and have a read through the various helpful hints that appear. Then click “Next” again to reach the following screen:
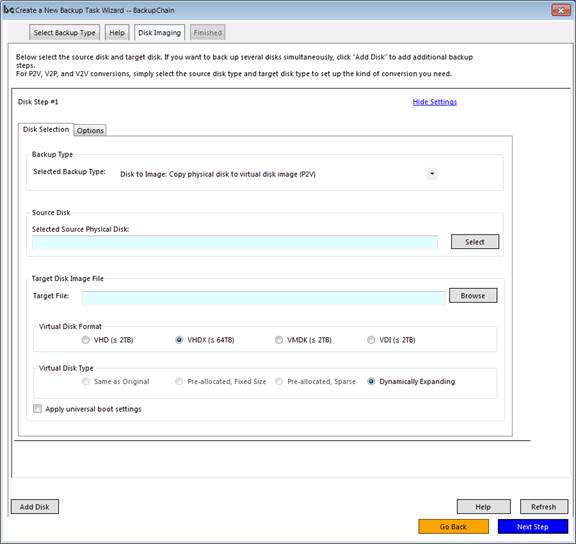
In the above screen you need to choose the type of backup (“disk to image” is preselected above), then the physical source disk and the target file for your backup image.
Disk to image backup (Copy physical disk to virtual disk image)
Copying a physical disk to a virtual disk creates a backup file with the disk contents on it.
You can later
Restore the machine by copying the virtual disk back to a physical disk.
Mount the virtual disk to extract files and folders (VHD and VHDX via Windows Disk Management), or use BackupChain’s granular restore tool (Disk Tools->Browse Disk Images and Virtual Disks) for all formats
Immediately boot the virtual disk as a VM by creating a “dummy” VM and attaching the virtual disk to the virtual IDE controller.
Click the Select button to choose from all installed disks on your server:
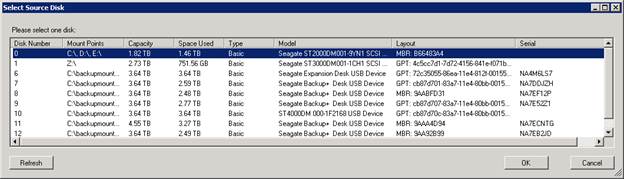
BackupChain supports raw disks, basic and dynamic disks (see https://technet.microsoft.com/en-us/library/bb726994.aspx for definition of terms), and GPT as well as MBR partition layouts.
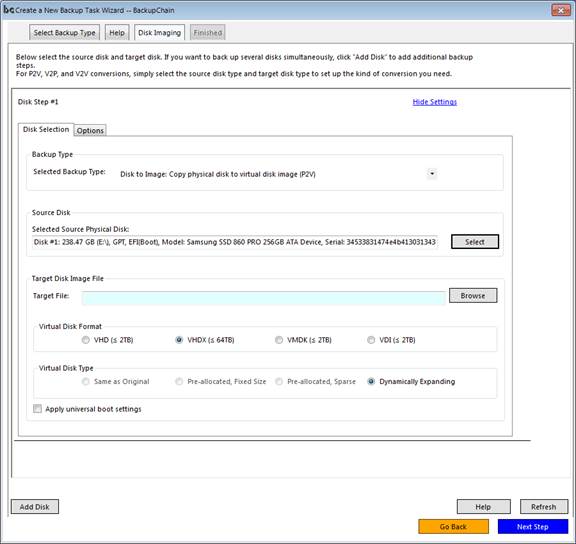
After you select your source disk, click OK. The selection then appears in the backup/conversion step:
Note: Dynamic physical disks must be converted all combined in one step by adding additional disks to the above screen using the Add Disk button. Dynamic disks in Windows (not to be confused with expanding virtual disks, see https://technet.microsoft.com/en-us/library/cc737048 for a definition) allow spanned, striped, and mirrored volumes that may span several disks. If you want these disks imaged you must select all of them to be converted simultaneously. You can add additional conversion steps (i.e. disks) by clicking the “Add Disk” button. Each disk will then be converted to its own virtual disk or physical disk target.
Specifying the target file
Enter the full file path to the virtual disk you would like to create or click browse to select a target file location or network location. Our example below backs up to Z:\backup-vhds\servermaindisk.vhd:
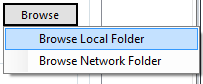
Click “Browse” to specify the target image file, which could be stored on a local disk path or a network share.
Once you select your target folder, the ‘target file’ field shows your selection:
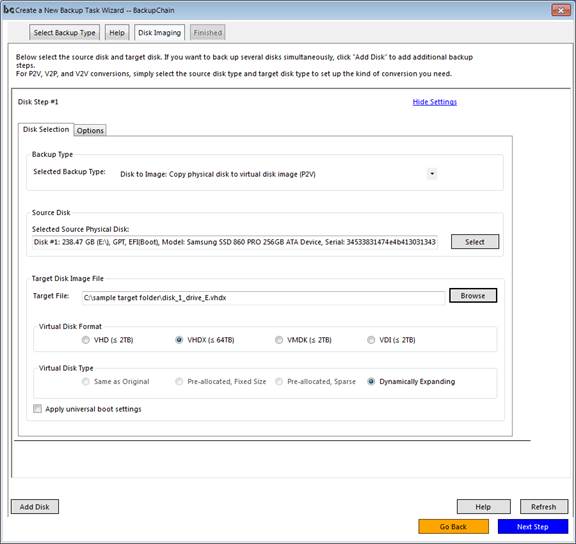
Below the target file you see several options. The first row is the target format (VHD, VHDX, VMDK, and VDI). The only format that supports disks larger than 2TB is VHDX. If you intend to use your backup file to boot the image as a virtual machine, note that VHD and VHDX can be used in Hyper-V, and all formats except VHDX should work in VirtualBox. VMware Workstation and Player can handle VMDK and VHD, whereas for ESX/vSphere you need VMDK.
The above screen requires at least two choices to be made: the virtual disk format (VHD, VHDX, VMDK, and VDI) and whether you want a pre-allocated, fixed sized virtual disk or a dynamically expanding virtual disk.
A dynamically expanding virtual disk will only hold the data volume that is actually occupied in the physical disk and will hence be smaller than the original disk. For example, if your physical disk is 2 TB and only 100 GB are occupied, the virtual disk grow to be around 100 GB as well after the backup completes.
Choosing a virtual disk target type
If your source disk, the physical hard disk, is 2 TB or less, you can choose any virtual disk type; however, if your disk is above 2 TB you can only use VHDX.
Note that VHDs can be used in Hyper-V and some versions of VMware Workstation and VirtualBox. VHDs may be mounted to Windows 7 and Windows Server 2008 and later.
VHDX, at the time of this writing, can only be used in Hyper-V or mounted as a disk in Windows 8 or Windows Server 2012 and later.
VMDK can be used on VMware Workstation and ESX. VMware offers a tool to mount VMDK as a disk to Windows.
VDI can be used in VirtualBox.
All formats can be opened in BackupChain for a granular restore via the main menu Disk Tools->Browse Disk Images & Virtual Disks. There you can restore / extract individual files and folders without having to restore the entire disk.
Physical to Physical Disk Copy (Disk to Disk: Sector level copy)
Physical disk copy allows you to have a copy of your hard drive immediately accessible.
Example usage:
Copy RAID array disk contents to a single disk, which can be simply plugged in or brought online (via Windows Disk Management) when needed. Or the disk can be plugged into another server at any time.
Copy the system disk or data disk to another disk. Unlike RAID you have some reaction time in case of a virus attack or accidental deletion. Also the disk can be placed offline or physically removed from the server for additional safety and security.
Copy multiple disks to another set of disks for a complete clone of the current server.
Physical disk to disk backup over the network: Create VHDs on another server and share them using a network share. Mount the VHDs on the other server where you plan to run the backup. The disks now appear as “real” physical disks. Create a physical disk to disk copy task in BackupChain to copy each disk to its own target disk. In case of a disaster the disks are immediately accessible on the other server or any other server over the network. The VHDs can be attached to VMs if need be (and booted) or simply attach them via Disk Management to any computer you want.
To copy one physical disk to another, select “Disk to Disk: Sector-level copy physical disk to physical disk” in the Disk Imaging tab screen as shown below:
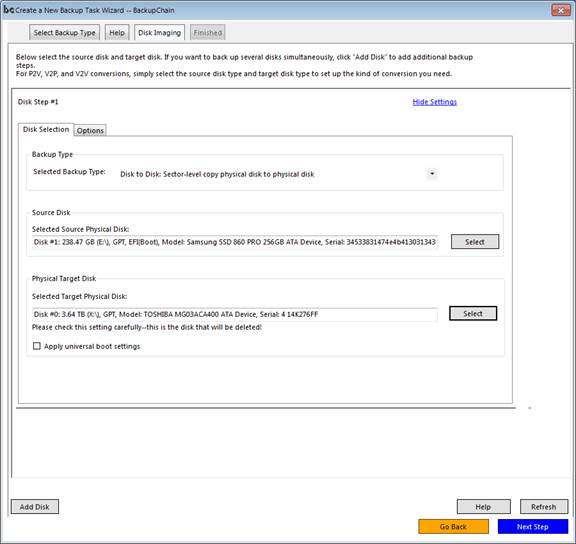
Then click “select” to choose the target physical disk.
Note that the target disk will be deleted when the backup task is run.
The target disk has to be either larger or the same exact size as the original. Virtual disks mounted in Windows (VHD or VHDX) using Windows Disk Management may also be used as targets or source disks.
Note: Please make sure your boot settings are configured to force booting from the “correct” disk. Once you have several bootable disks in the server, the BIOS might use the “wrong” one next time you boot and if they happen to be clones, it will be easy to confuse them as the original.
Important notice regarding disk to disk live backups
When copying one physical disk directly to another live (while Windows is running), BackupChain needs to make changes to the destination disk in order for Windows to be able to function and boot correctly with both disks being mounted side-by-side. For example, BackupChain has to assign a new ID to the destination disk to avoid issues, since all operating systems expect each disk to have a unique identifier. In addition, the boot loader of the target disk needs to be modified to make the copied disk bootable just as the original. BackupChain can only take care of Windows boot loaders. If you are using a different boot loader product or operating system, you may need to edit the boot settings to work with the new disk ID.
If you intend to take the physical disk copy and boot it elsewhere, please ensure the BIOS is set to the same boot setting (EFI / UEFI or legacy) as the original server where the backup was made. It also helps to boot first into safe mode to give Windows an opportunity to switch critical boot-related drives if need be. In addition you can run the BackupChain tool “Prepare disk to boot as VM” (Disk Tools in main menu) and alter the boot settings before attempting to boot on completely new hardware. If possible try booting using an IDE / SATA port first. Once Windows is booted you can install RAID drivers if need be and attach the disk to a RAID controller.
Automatic Cleanup of Old Virtual Disk Backups
Once you save the task, in the main screen you will find a new tab “Imaging Options”:
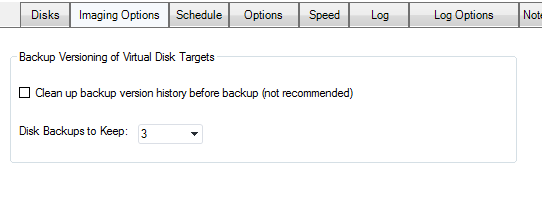
The above screen offers a field at the bottom “Disk Backups to Keep = 3” where you can specify how many backup files you wish to keep. The “3” above means you want to keep the last three virtual disk backup files created by BackupChain. After that, the oldest backup file will be deleted at the end of each successful backup cycle. You can change the number or enter ALL to keep all virtual disks created. Since each virtual disk created will be quite large, you will want to limit the number of virtual disks created depending on the backup storage size you have available.
Note that here BackupChain includes an additional option “Clean up backup version history before backup” which is not recommended unless you are using backup rotation or multiple backup targets. By default, BackupChain deletes the oldest backup file after a backup cycle completes successfully. This is to ensure there is always at least one good backup to restore from. In certain circumstances you may want to delete the oldest backup before placing the newest backup, for example when backup storage space is very limited and you have another backup on different media. However note that using this option could possibly result in having no backup to restore from in case the backup is stopped or fails.
Backing up Several Disks Simultaneously
Use the “Add Disk” button to add additional “Backup / Conversion” steps as needed. Whenever you have a server with multiple hard drives where one service is accessing more than one, you may have to back up all disks simultaneously. For example, SQL Server may use be using the system disk as well as disk #2 to store the bulk of its database records. In that case you would select disk #0 (assuming that’s the system disk), then click ‘add disk’ and in the new section, select “disk #2” as the source.
When you back up several disks simultaneously, the backup is consistent in time and the resulting virtual disk backup files are consistent to each other as the backup was taken at the same point in time for all disks.
Automatic cleanup
If your target disk above is a virtual disk and you intend to run this backup repeatedly, BackupChain offers an automatic cleanup mechanism. See page 38 for details.
Backup Software Overview
The Best Backup Software in 2026 Download BackupChain®BackupChain Backup Software is the all-in-one Windows Server backup solution and includes:
Server Backup
Disk Image Backup
Drive Cloning and Disk Copy
VirtualBox Backup
VMware Backup
FTP Backup
Cloud Backup
File Server Backup
Virtual Machine Backup
Server Backup Solution
Hyper-V Backup
Popular
- Best Practices for Server Backups
- NAS Backup: Buffalo, Drobo, Synology
- How to use BackupChain for Cloud and Remote
- DriveMaker: Map FTP, SFTP, S3 Sites to a Drive Letter (Freeware)
Resources
- BackupChain
- VM Backup
- Knowledge Base
- BackupChain (German)
- German Help Pages
- BackupChain (Greek)
- BackupChain (Spanish)
- BackupChain (French)
- BackupChain (Dutch)
- BackupChain (Italian)
- BackupChain Server Backup Solution
- BackupChain is an all-in-one, reliable backup solution for Windows and Hyper-V that is more affordable than Veeam, Acronis, and Altaro.