

Automatic Hyper-V Restore to New Path or Original Location
For detailed product information, please visit the BackupChain home page.
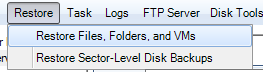
To restore using the Single-Click Backup & Restore, select the backup task from the Backup Task List (unless restoring on a new machine) and select Restore from the main menu. Proceed with Restore Files and Folders:
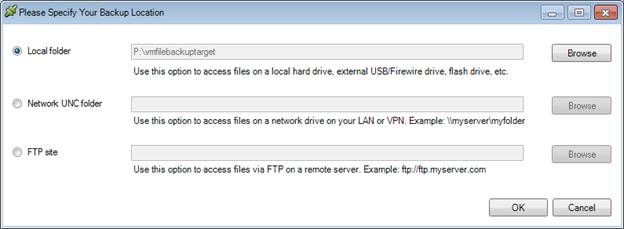
Then you need to fill in the details about the backup location. This information is usually preset with the task settings:
Note: You need to select the root folder in this step.
If you open the folder in Windows Explorer, the root folder may look like this:
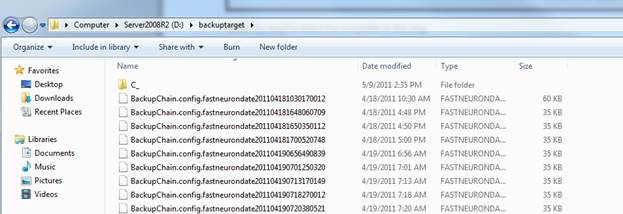
Notice the C_ folder (for C: drive) and the BackupChain.config files. These files are necessary for restore operations.
Proceed and click OK and the Restore Point Selection Screen opens:
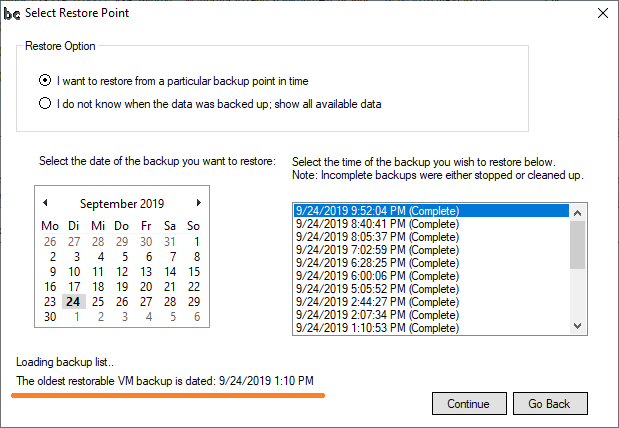
While all backup restore points are being read, the screen will update and show the oldest fully restorable VM backup (shown in orange above). Prior backups might be partially restorable, depending on your backup settings. On the right, the selected day and time shows “(Complete)” when the backup was successful and all files were found in the backup folder.
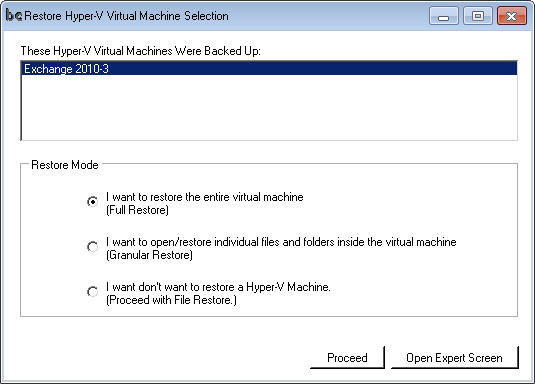
Please select the restore point and proceed. From the virtual machine selection screen, select the virtual machine you want to restore and leave the Full Restore option selected. If you want to restore just a subset of a virtual machine, such as a folder or a file from inside the VM, you need to select Granular Restore. Note: Granular Restore is only available in BackupChain Server Enterprise Edition.
Case #1: We want to restore to the original location, and we want the VM to have the original identity.
Important Note: You must delete the original VM by hand before you proceed, if you are restoring the original VM identity. VM clones can be restored side-by-side with the original (see case #2 below).
In the extraction options select “Restore files to their original location” in Miscellaneous Settings and check “Clone virtual machine” in Hyper-V Settings:
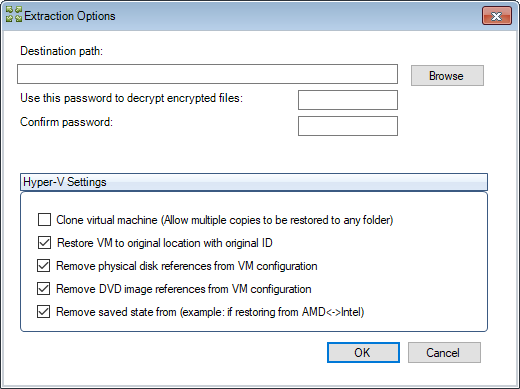
And we are ready to go. Note the destination path is kept empty and the option “restore VM to original location is checked.
Notice that the option “Clone virtual machine” in Hyper-V Settings should always be checked in order to create a new identity. You can re-create the original identity as well and it makes sense to do so if the VM was deleted or if you are restoring to a new server.
Note: If your VM was originally saved directly in C:\ProgramData\Microsoft\Windows\Hyper-V\Virtual Machines, you must restore it to a new location, such as C:\RestoredVMs. It is generally not recommended to create virtual machines in the “default” folder; rather, create a new folder for virtual machine data, ideally on a separate drive for better performance.
Note: Restoring to a cluster shared volume is supported; however, you need to add the VM manually to the Failover Cluster Manager. The VM will appear automatically in the Hyper-V Manager instead.
Case #2: Restore with a new identity but to a new, separate folder.
Follow the same step as above but specify a target folder and ensure the option select “Restore files to their original location” in Miscellaneous Settings remains unchecked.

If you uncheck the ‘clone virtual machine’ option, the VM will be restored using its original identity. Ensure the original VM is no longer on the network to prevent computer name clash.
Starting the machine
The restored machine should appear in the Server Manager’s Hyper-V role screen. If it doesn’t, refresh the screen or right click on the Hyper-V Manager and stop the management service. This doesn’t affect running virtual machines and you can start again as soon as it stops.
Once the new machine appears you may want to review and update the virtual machine network connection settings. The network connection is removed to avoid network IP and computer name clashes when the VM is restored on the original server. You can always add the network controller back to the VM without rebooting the VM at any time. You may also want to allocate a new MAC address for the cloned VM but it may not be necessary if dynamic allocation is being used on your host.
Note: When powering up a restored VM, If you receive a “Windows has not been shut down correctly” it’s because the “booted” flag hasn’t been cleared from the hard disk image. Be assured that the VM is in a good condition.
Backup Software Overview
The Best Backup Software in 2026 Download BackupChain®BackupChain Backup Software is the all-in-one Windows Server backup solution and includes:
Server Backup
Disk Image Backup
Drive Cloning and Disk Copy
VirtualBox Backup
VMware Backup
FTP Backup
Cloud Backup
File Server Backup
Virtual Machine Backup
Server Backup Solution
Hyper-V Backup
Popular
- Best Practices for Server Backups
- NAS Backup: Buffalo, Drobo, Synology
- How to use BackupChain for Cloud and Remote
- DriveMaker: Map FTP, SFTP, S3 Sites to a Drive Letter (Freeware)
Resources
- BackupChain
- VM Backup
- Knowledge Base
- BackupChain (German)
- German Help Pages
- BackupChain (Greek)
- BackupChain (Spanish)
- BackupChain (French)
- BackupChain (Dutch)
- BackupChain (Italian)
- BackupChain Server Backup Solution
- BackupChain is an all-in-one, reliable backup solution for Windows and Hyper-V that is more affordable than Veeam, Acronis, and Altaro.