

BackupChain Professional Edition for Hyper-V Backups on Windows 11 PCs
For detailed product information, please visit the BackupChain home page.
The following article describes the backup of VMs running on Hyper-V on top of Windows 11, Windows 10, and Windows 8. The steps shown below are screenshots of our Hyper-V Backup Solution for Windows Servers and Windows PCs: BackupChain®.
Step-by-step Backup Instructions
Note that it is possible to use the Server Editions of BackupChain on Windows 11 and use the Automatic Hyper-V Backup features discussed in previous sections. However, for typical PC-usage, such as for development and testing, the Professional edition offers a wide range of features to get the job done well.
Note that you can only back up live virtual machines when they are stored locally. Live backup does not work over the network (only exceptions are SAN and CSV backups); this means you cannot pull VMs stored on another server. VMs must be running locally in order to be backed up live. Offline backups (when VMs are shut down) do work over the network, however, when accessed via a UNC path.
1. Open the New Backup Wizard and create a new “Hyper-V Backup (Client)” task using the New Task button: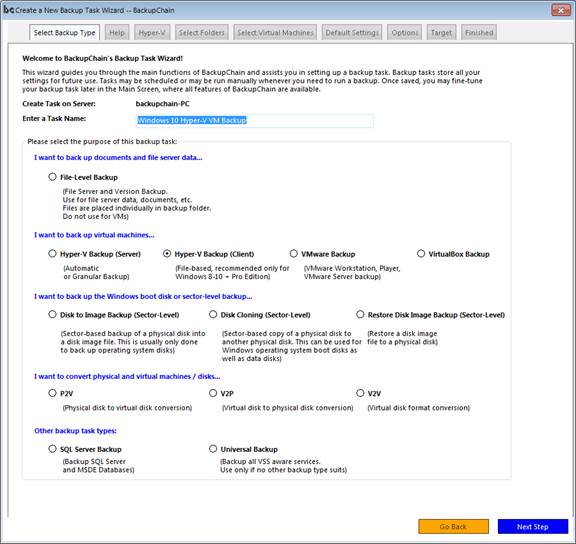
 Note: You cannot pull files over
the network. VMs must be installed locally or on a CSV in order for live backup
to work.
Note: You cannot pull files over
the network. VMs must be installed locally or on a CSV in order for live backup
to work.
Where are the VM files located?
If you are not certain where the VM files are stored, you can check the VM’s settings in Hyper-V: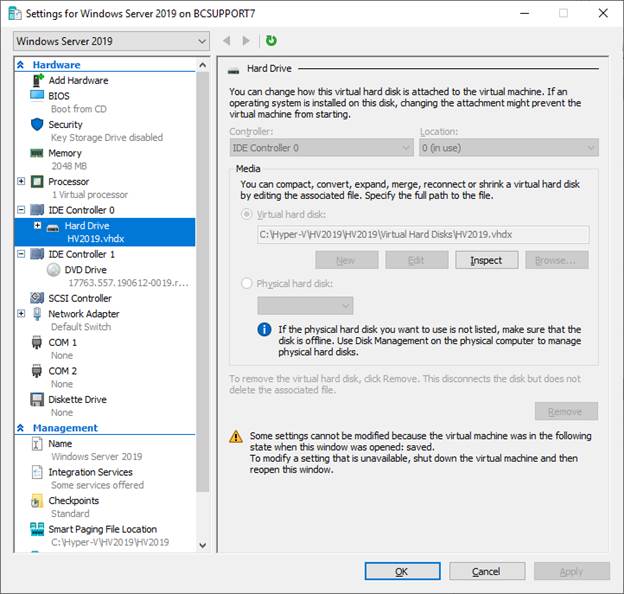
 Both the checkpoint and virtual
disk folders are usually inside the same subfolder created for the VM, unless
you did not specify a folder when you created the VM.
In that case the VM is on drive C:
(not a recommended practice but works) and stored in the already preselected
default folders:
C:\ProgramData\Microsoft\Windows\Hyper-V
and C:\Users\Public\Documents\Hyper-V
For simpler VM management purposes,
as well as for better performance, it’s recommended to set a dedicated folder
for each VM on a separate drive, ideally a separate physical disk or disk
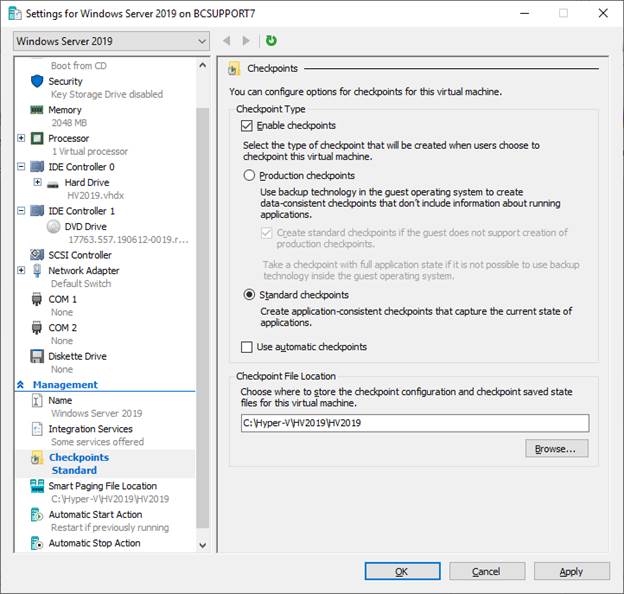
array. The use of checkpoints is not recommended but as long as you include the
folder in the BackupChain backup configuration, they will be backed up as well.
If your VM is stored in the default folders (the two listed above), the
checkpoints will also be stored in there. If you created a dedicated folder
when creating the VM, all VM-related files will be within it and you have all
files nicely in one folder.
Note: It’s not required for backup
purposes but if you wish to change the VM configuration from default folders to
a dedicated folder, please proceed as follows:
Both the checkpoint and virtual
disk folders are usually inside the same subfolder created for the VM, unless
you did not specify a folder when you created the VM.
In that case the VM is on drive C:
(not a recommended practice but works) and stored in the already preselected
default folders:
C:\ProgramData\Microsoft\Windows\Hyper-V
and C:\Users\Public\Documents\Hyper-V
For simpler VM management purposes,
as well as for better performance, it’s recommended to set a dedicated folder
for each VM on a separate drive, ideally a separate physical disk or disk
array. The use of checkpoints is not recommended but as long as you include the
folder in the BackupChain backup configuration, they will be backed up as well.
If your VM is stored in the default folders (the two listed above), the
checkpoints will also be stored in there. If you created a dedicated folder
when creating the VM, all VM-related files will be within it and you have all
files nicely in one folder.
Note: It’s not required for backup
purposes but if you wish to change the VM configuration from default folders to
a dedicated folder, please proceed as follows:
- Delete any checkpoints that may exist. Check the Hyper-V Manager status for the VM and wait until the VM status is clear, if necessary.
- Create a new VM with similar settings as the original
- Create the dedicated folder and move the VM’s VHDs into it
- For each VHD that exists, add a virtual disk to the VM and point it to the VHD in the dedicated folder
- Remove the old VM (optional) and boot the new one.
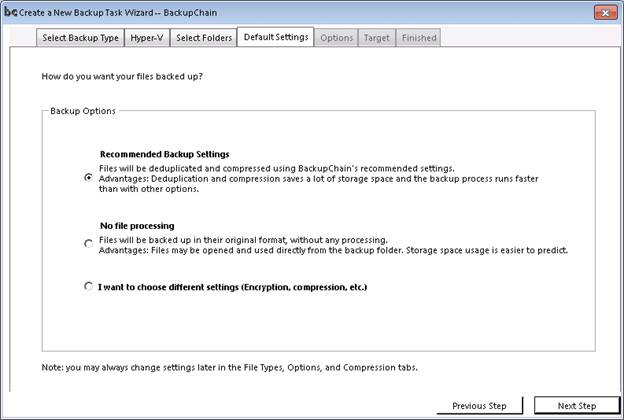
Recommended backup settings will turn on deduplication, data compression, and a retention period of 10 file versions (i.e. after the 11th backup of a file the oldest backup is deleted).
“No file processing” switches off deduplication and data compression and uses a retention period of 10 file versions.
If you choose custom settings the following screen opens:
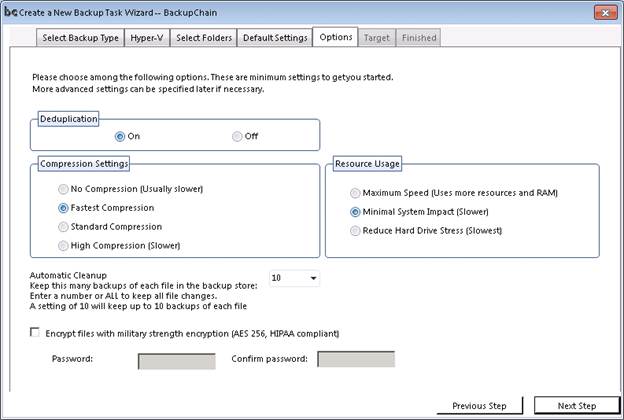
Here you can preset the basic settings of your task in just one screen, such as encryption, deduplication and data compression. All the fine-tuning may be done later in the Main Screen of BackupChain.
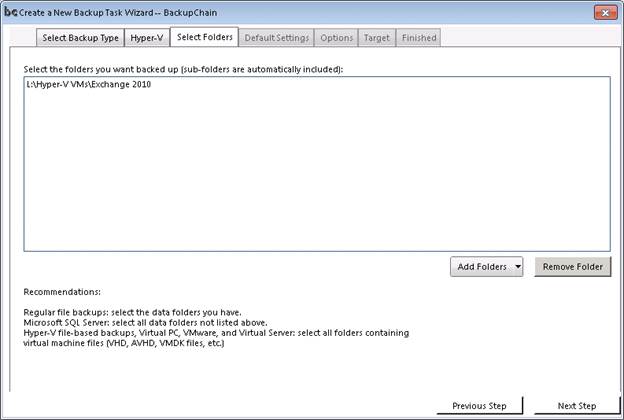
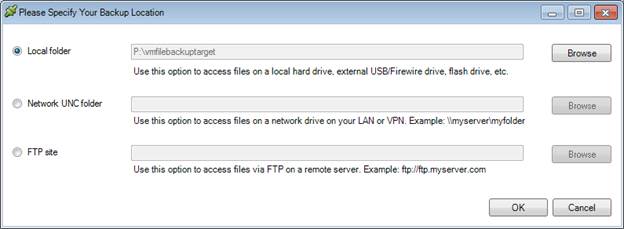
Now we are ready to proceed and set the backup target:
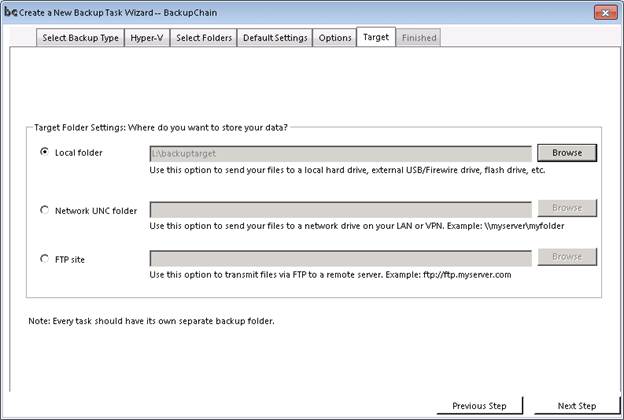
In our example above, we use a local drive but you could send your backups to a network device or FTP site instead as well. Note that deduplication does work over standard FTP.
Then click Next Step:
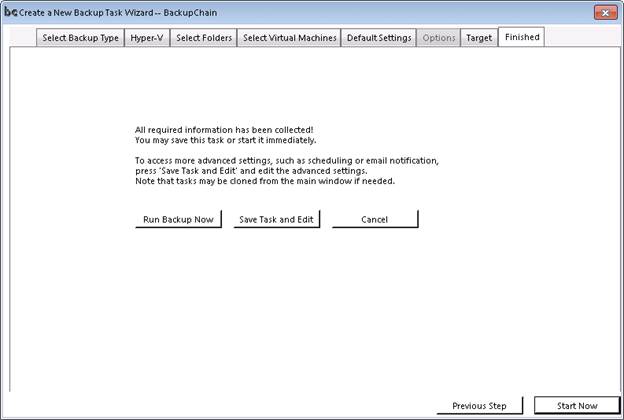
If you want to run the task immediately, click Start Now. Otherwise click Save Task and Edit, to return to the Main Screen where you can add a schedule to the task and change numerous other settings.
Restoring Hyper-V VMs running on Windows 11 hosts using the BackupChain Professional Edition
To restore a Hyper-V virtual machine using the standard file restore process, select the backup task from the Backup Task List (unless restoring on a new machine) and select Restore from the main menu. Proceed with Restore Files and Folders:

Then you need to fill in the details about the backup location. This information is usually preset with the task settings:
Note: You need to select the root folder in this step.
If you open the folder in Windows Explorer, the root folder may look like this:
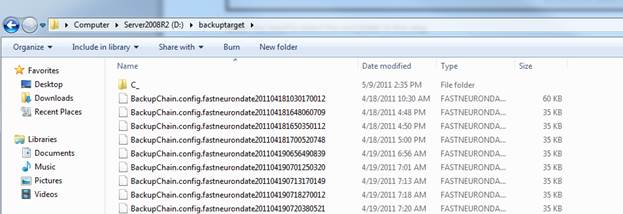
Notice the C_ folder (for C: drive) and the BackupChain.config files. These files are necessary for restore operations.
Proceed and the backup set selection opens:
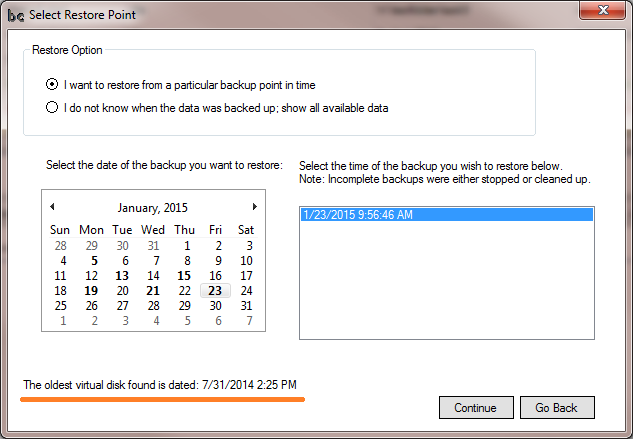
Note that BackupChain will scan in the background all available restore points. It will look for the oldest virtual disk that is available and display the date (see above in orange). Depending on your backup settings, there may be restorable backups from before that, but the date displayed, once the scan is complete, shows the backup date of the oldest virtual disk found, which is the oldest fully restorable backup.
Either select “I do not know when the data was backed up” to obtain the full view of all existing backups, or select a particular day and time.
Proceed and click OK and the Restore Screen opens:
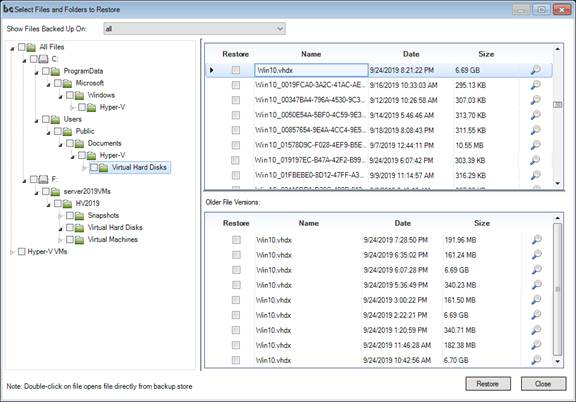
Navigate to the folder containing the virtual machine files and check the entire folder. This will restore all files within this folder as well as all subfolders. The restore process will restore the latest version of each file in the folder. The “latest version” is determined by the date filter at the top of the restore screen. Now proceed by clicking Restore.
If the virtual machine contains snapshots, you need to restore all the files to the same folder, such as C:\VHD. WARNING: Even though the default restore setting does not overwrite files without your permission, you still need to be careful not to overwrite files accidentally!
Replacing the original VM
If you would like to replace the original VM with the one from your backup, there are several options.
First you need to turn off the original VM.
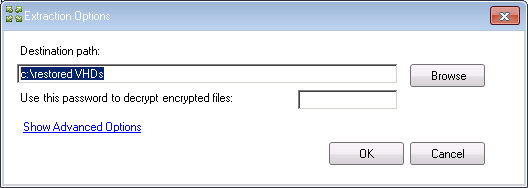
If your VM was neatly stored in a single dedicated folder, the restore process is extremely simple. You can replace the files at their original location via a setting in the ‘advanced options’ of the Extraction Options screen above. In that case, do not enter a destination path.
If your VM is stored in the default folders C:\ProgramData\Microsoft\Windows\Hyper-V and C:\Users\Public\Documents\Hyper-V, you will see that Hyper-V places all VM files in there, for all VMs you have. This isn’t exactly neat but still works. When doing a restore you will see those two folders in your Restore Screen. Select the VHD and any AVHD files (checkpoints if any) and click restore. If you want the latest version of your VM, select the VHDs at the top, like Win10.vhdx below:

If you need an older version, do not select line at the top, select from the bottom half, or set the Restore Point at the top of the screen “Show Files backed up on:”
If your VM doesn’t contain checkpoints (recommended practice), then all you need to restore is just the VHD file/s, there’s just one for each virtual drive in the VM. If checkpoints are present you need to restore those as well (file extension AVHD and AVHDX).
Restoring a VM to a New Hyper-V Host or Side-by-Side with Original VM
Select the relevant VM files as described in the previous section. For VMs that use checkpoints you must restore those as well (file extension AVHD, AVHDX). If your VM does not use checkpoints (recommended practice) you just need to have the virtual disks for the VM (VHD or VHDX files).
In the Extraction Options screen, enter a destination path and finish the restore process.
You can enter any path you want, including UNC; it will be created if necessary.
If you want the VM restored to its original location, it can’t live side-by-side with the original. In that case you will need turn off and delete the original VM first. Note that Hyper-V does not delete the VHDs when you delete the VM in Hyper-V Manager. Then do not enter a path in the screen above and click ‘show advanced options’. When the screen expands choose ‘restore to original location’ and keep the destination path box empty.
Head over to Hyper-V Manager and create a new VM in Hyper-V with similar settings as before (optional).
Now add a new Hyper-V machine via the Server Manager and connect to the existing virtual disk:
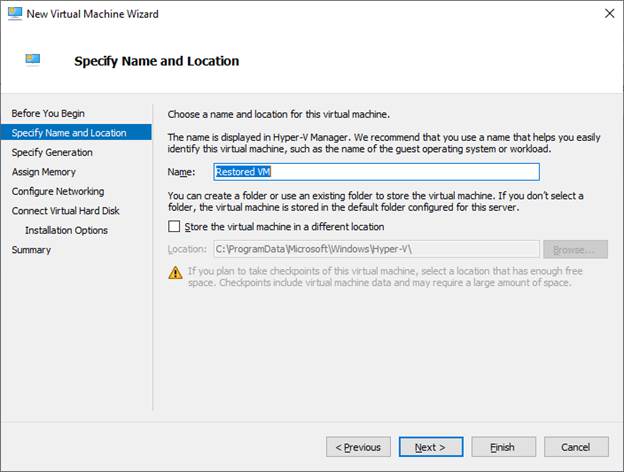
Try to assign the same or similar settings, such as number of CPUs and RAM, and start the machine.
Instead of creating a new virtual disk, select the one that BackupChain restored:
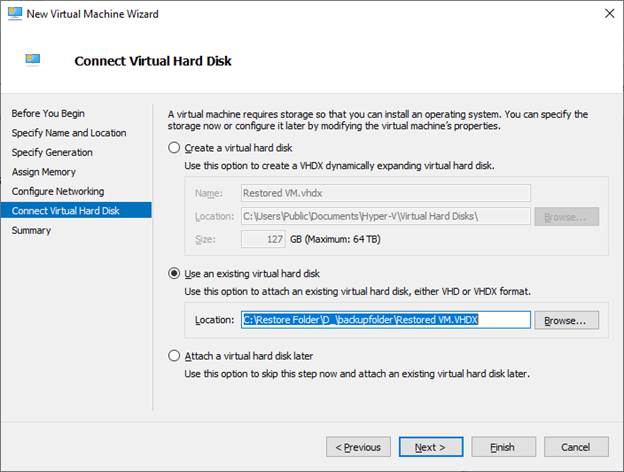
The VM is now ready to boot. Note that if the VM had checkpoints you need to place them next the VHDX file in the same folder. In the screen above you would select the most recent AVHDX for the VM’s main VHDX file, instead of the VHDX file. Checkpoint files always contain the parent’s name in their file name so you can track them easily.
Summary
These steps above summarize the steps required to restore a VM on any Hyper-V host running on Windows 11, Windows 10, or Windows 8. Please note that the Server Editions of BackupChain, such as Server Enterprise for PCs contain automatic backup and restore features that automate the entire process. When backing up or restoring VMs, you just select the VM from a list and BackupChain does the rest. However, for home, test, and development usage, the Professional edition provides all the features needed for a robust backup system that provides deduplication, compression, encryption, alerts, and many other features. To keep the management effort to a minimum and the backup and restore steps as simple as possible, it’s greatly recommended to do two things: place each VM in a dedicated folder (ideally all VMs under a dedicated subfolder, like D:\VMs and then D:\VMs\Windows10VM., etc.) and do not use checkpoints, at least use them only temporarily. That reduces backup to just selecting D:\VMs and restoring to just selecting/replacing D:\VMs for a full restore of all VMs or D:\VMs\Windows10VM for one resting one particular VM. More complex environments can be handled by the Professional edition as well, but require more management and configuration. It may be best to use the Server or Server Enterprise if your VM configuration is complex and changes frequently.
Backup Software Overview
The Best Backup Software in 2026 Download BackupChain®BackupChain Backup Software is the all-in-one Windows Server backup solution and includes:
Server Backup
Disk Image Backup
Drive Cloning and Disk Copy
VirtualBox Backup
VMware Backup
FTP Backup
Cloud Backup
File Server Backup
Virtual Machine Backup
Server Backup Solution
Hyper-V Backup
Popular
- Best Practices for Server Backups
- NAS Backup: Buffalo, Drobo, Synology
- How to use BackupChain for Cloud and Remote
- DriveMaker: Map FTP, SFTP, S3 Sites to a Drive Letter (Freeware)
Resources
- BackupChain
- VM Backup
- Knowledge Base
- BackupChain (German)
- German Help Pages
- BackupChain (Greek)
- BackupChain (Spanish)
- BackupChain (French)
- BackupChain (Dutch)
- BackupChain (Italian)
- BackupChain Server Backup Solution
- BackupChain is an all-in-one, reliable backup solution for Windows and Hyper-V that is more affordable than Veeam, Acronis, and Altaro.