

Boot Hyper-V Server 2019, 2016 from USB Stick or Drive
Setting up a Hyper-V Server 2019 or Hyper-V Server 2016 to boot and run from a USB stick is actually easy to accomplish with the steps shown below.
The most important thing is you need a fast USB 3.0 stick that offers fast random access speeds and high throughput at a good price. One such device is SanDisk Ultra 64GB and larger, with a USB 3.0 connection.
Materials Needed
You will need:
- A computer running Windows 8.1 or Windows Server 2012 or later
- The ISO files of Hyper-V Server 2019 or 2016 or 2012 downloaded from Microsoft’s Evaluation center or from here.
- A USB stick or hard drive, ideally USB 3.0. SanDisk Ultra 64GB costs less than $20 and works really well. 32GB is the absolute minimum. A USB 3.0 external hard drive might be a better choice if you need a lot of space and want to also run several VMs.
- Rufus, download from our mirror or from their website
Run Rufus to Prepare the USB Stick
Select the USB stick and the ISO image file you downloaded. Important: Select Windows to Go. If you don’t see that option you are not running Rufus on Windows 8.1 or later or the ISO is not the correct one.
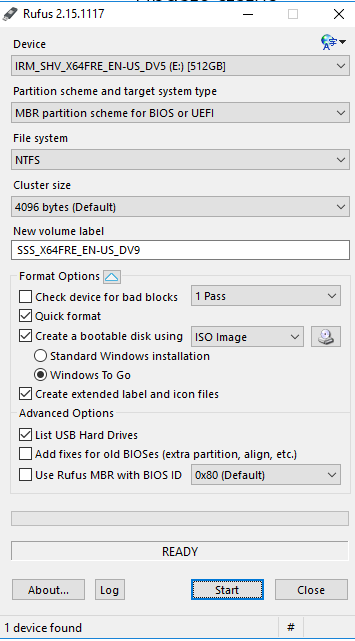
Click start and let it do its magic.
Preparing the USB Stick to Boot Hyper-V Server 2019 from USB 3.0
If you use the Hyper-V Server 2019 (or older versions), there is one additional step necessary after finishing the Rufus installation process. You need to open the Registry Editor and click on “HKEY_LOCAL_MACHINE”. From the main menu click File and Load Hive.
Then navigate to the stick’s file system and select the file X:\Windows\System32\Config\System, where X: is the example drive letter of the USB stick or drive you are using. The registry editor will then ask for a name for a new key to load the hive to. In our example below we used “testttt”:
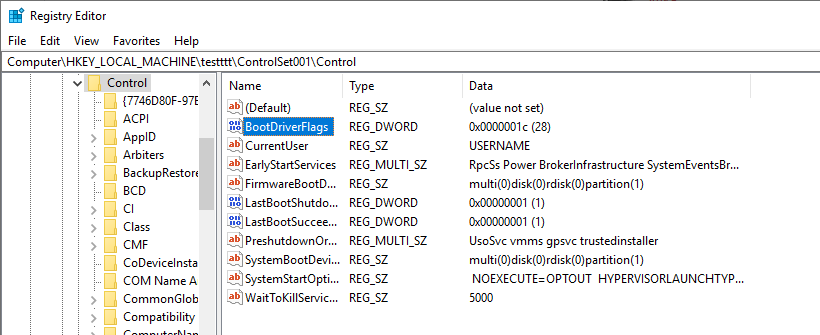
Then open the newly created node ‘testttt’ and navigate to ControlSet001 then Control and set BootConfigFlags to 1c as shown above. Repeat the steps in ControlSet002. Then go back to the node ‘testttt’ and select unload hive from the main menu. The change is necessary to configure Hyper-V Server to boot from USB and load the drivers at boot time.
Once booted, the Windows installation will finish as usual and ask for a admin password.
Boot Settings to Run Hyper-V Server from a USB Stick
Now the USB stick is ready to boot Hyper-V Server but you need to tell the BIOS that you want to boot from USB.
During the Power On Self Test procedure when the computer boots, most BIOS developers use some F-key or ESC or DEL as a signal that you want to enter the BIOS.
Inside the BIOS change the boot order to try to boot from USB first, before the usual boot device. This will automatically give preference to the USB stick if it is plugged in.
Naturally, the BIOS has to support booting from USB, otherwise the stick won’t boot, but most modern motherboards today support USB boot.
How Well Does it Work?
Generally it works very well but only with the right hardware. We found that some USB sticks are much faster than others. Some sticks are good for copying large files and achieve really fast speeds; however, with many sticks we found random access speeds to be horrible. SanDisk Ultra is a fast stick at a very low price. The next best choice would be a USB 3.0 external drive, ideally SSD if you plan to run several VMs on it. While this kind of a setup is probably not the perfect choice for production systems, it’s a great strategy for software developers, testers, and system integrators who need to run through certain test procedures quickly and painlessly without having to swap hard drives. These USB sticks are also very useful as bootable recovery systems, when your main hard drive fails to boot. You can install BackupChain, our backup software, on the bootable Hyper-V Server stick as well and run disk backups, Hyper-V backups, and even restore cloud backups with it.
Do You Have Hyper-V Backup Software for Your Hyper-V Servers?
Now that you have set up a portable Hyper-V Server, you will definitely want to protect your virtual machines and use our backup solution for Hyper-V, which also backs up physical disks. BackupChain can also clone system disks as well as the disks with your VMs, live from disk to disk, while the system is running without any interference.
Download BackupChain, It’s Fully Functional on Hyper-V Servers
Download BackupChain and give it a test run. It runs on all versions of Windows, including Core installations and Hyper-V Servers.
Backup Software Overview
The Best Backup Software in 2026 Download BackupChain®BackupChain is the all-in-one server backup software for:
Server Backup
Disk Image Backup
Drive Cloning and Disk Copy
VirtualBox Backup
VMware Backup
Image Backup
FTP Backup
Cloud Backup
File Server Backup
Virtual Machine Backup
BackupChain Server Backup Solution
Hyper-V Backup
Popular
- Best Practices for Server Backups
- NAS Backup: Buffalo, Drobo, Synology
- How to use BackupChain for Cloud and Remote
- DriveMaker: Map FTP, SFTP, S3 Sites to a Drive Letter (Freeware)
Resources
- BackupChain
- VM Backup
- V4 Articles
- Knowledge Base
- FAQ
- BackupChain (German)
- German Help Pages
- BackupChain (Greek)
- BackupChain (Spanish)
- BackupChain (French)
- BackupChain (Dutch)
- BackupChain (Italian)
- Backup.education
- Sitemap
- BackupChain is an all-in-one, reliable backup solution for Windows and Hyper-V that is more affordable than Veeam, Acronis, and Altaro.
Other Backup How-To Guides
- How to Set up a Free NAS with NTFS for Backups and Hyper-V
- How to Rollout Windows Updates Without Internet Connection
- How to Backup Hyper-V Virtual Machine on Windows Server 2025 or Windows 11
- All Fixes for: The driver detected a controller error on \Device\Harddisk2\DR2
- Hyper-V Backup to NAS: Synology, Qnap, Netgear, Drobo, Buffalo
- How to Fix: The semaphore timeout period has expired, Error 121
- Video Step-by-Step Restore VM from Hyper-V Backup on Windows Server 2025 and Windows 11
- Backup Software with File History
- How to Fix Event 1135 FailoverClustering: Cluster node was removed
- Hyper-V Pass-through Disks: Advantages, Disadvantages, and Limitations
- Backup Software with VSS Support for Windows Server 2025 and Windows 11
- Best Network Backup Solution for Windows Server 2025 and Windows 11
- 18 Hyper-V Requirements and Recommended Hardware
- Version Backup Software with File Versioning
- Publications
- How to backup VMware VMs, Step-by-Step Video
- Boot Hyper-V Server 2019, 2016 from USB Stick or Drive
- How to Convert Pass-through Disk to VHDX or VMDK
- RAMKick™: Like RAMMap but Automatic, Empty System Working Set Memory
- Bit Rot & Data Loss: Are You Aware of Its Damage Potential?