

How to: Bare-Metal Recovery via USB Windows Server Boot Disk
Probably by far the best option to do bare-metal recoveries and other bare-metal operations is to have a USB pluggable boot disk or USB stick with Windows on it.
You can prepare such a boot disk ahead of time and be prepared in case you do not have a second PC or server where disk restore operations can be performed. In addition, in case you need to restore to a unique hardware system configuration, it makes sense to have a USB boot disk prepared with all the drivers you may need.
Once you boot Windows from your USB hard drive, you can access our backup software, including its disk image and disk cloning features to restore your hard disk images to new hardware.
How to Boot Windows from a USB External Hard Drive or USB Stick
The video below shows the steps involved. The steps are also illustrated below.
Materials
First: Download the Windows Server 2025 or Windows 11 Retail or Enterprise ISO from Microsoft. The 180 day trial for Windows Server 2019 is available from the Microsoft Evaluation Center or directly here and the ISO for Windows 10 can be downloaded here. Download the retail ISO of Windows 11 here.
Note: you could also use an older version of Windows; however, Windows 10 and Windows Server 2019 adapt themselves very well when you switch hardware, so it’s a major plus since you really want a portable Windows system. The trial version of Windows is perfectly fine. You could also use the ISO of the free Hyper-V Server 2019 system (download here) or the retail version of Windows 11 or 10 if you want the boot disk to work forever, i.e. beyond 180 days. Windows 11 and 10 Retail Editions do not expire even without activation.
If you are going to use the Windows 10 ISO or Windows Server 2016 ISO, you must have at least Windows 8.1 installed in order to proceed with the Rufus tool; otherwise, the Windows-to-Go option will not appear.
Second: Download Rufus, either from the developer or use our mirror. It’s a tool that will prepare the USB disk or stick for you so that you can boot Windows from it, even when the computer has no hard drive. You must run Rufus on Windows 8.1, Windows 10, or Windows Server 2012 and later in order for the “Windows to Go” option to appear.
Third: A USB stick or USB hard drive, with a capacity of at least 15 GB or 64 GB for newer OSes.
Unfortunately most USB sticks on the market are quite slow for random access. Therefore, we strongly recommend using a USB hard drive instead of a USB stick for better performance. Consider using a portable SSD drive with USB 3.0, or better USB-C, interface. It’s very small, doesn’t require a power supply, and as fast as an internal drive.
A low-cost and very fast USB stick for this purpose is SanDisk Ultra USB 3.0 64GB, which only costs $18. The best performance nowadays is with an external SSD with USB-C interface.
Fourth: You need to run Rufus on a computer running Windows 8, Windows Server 2012 or later; otherwise, the Windows to Go option will not show.
How to Create a Windows Server 2025 Bootable USB Disk
The procedure is always the same, regardless of the Windows version contained in the ISO file you downloaded. You must run Rufus on Windows 8.1 or later; otherwise the “Windows to Go” option below will not show up.
Configure Rufus as follows:
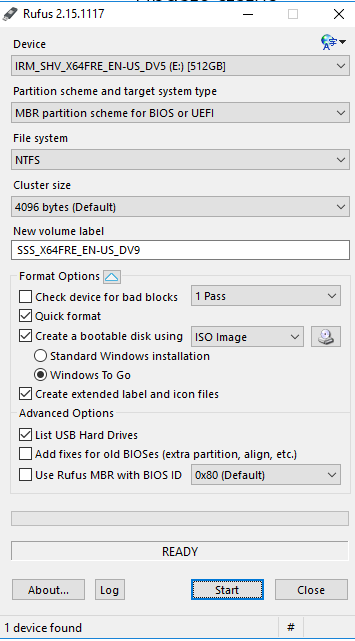
Click on ‘List USB hard drives’ in case your drive does not show up under ‘devices’. Be sure to select ISO image and the button to the right, which will open a dialog to browse for the ISO file you downloaded in the previous step.
Before clicking start, make sure you selected the correct drive. It will be deleted!
Hit start and wait until it’s finished.
Boot Windows from USB
When the operation is finished, the USB disk is ready to boot from. You may need to configure your BIOS to boot from USB or try F8 or F10 during the BIOS startup to access the boot menu (varies, depending on installed BIOS). Select USB and let Windows boot up. It may need to reboot once to finalize all settings. The Windows USB disk is now ready.
Install Drivers in the USB Windows System
Now that Windows is booted, if need be, you can install all drivers you need. You will find, however, that Windows 10 and Server 2016 ship with a large database of preinstalled drivers. Installing drivers might, hence, not be necessary.
Install BackupChain on the USB Disk
Now that you have the Windows USB system running, download BackupChain and place the installer executable after unzipping somewhere on the USB disk. Do not install BackupChain yet unless you are going to do a recovery right now. Install it when you need it, as the trial is fully functional for 20 days.
Finished!
The USB boot disk (or stick) is now ready to use whenever you need it. You could augment this type of rescue disk with anti-virus tools and all kinds of other emergency utilities that you may need. The great thing about it is that it’s a full blown Windows operating system, with user interface and all drivers. It has the network capabilities you may need to cope with all kinds of recovery scenarios.
You will find that having a Windows USB boot disk is by far more convenient and powerful than a boot CD or Windows PE system with just the backup software on it.
How to Start BackupChain on a Hyper-V Server or Windows Core from the Command Prompt
BackupChain has a full user interface even on core installations of Windows and on Hyper-V Server, where no Windows desktop experience is available.
Simply run:
C:\Program Files\FastNeuron Inc\BackupChain\BackupChain.exe
from the command line and the full user interface will appear. Remember that backups run in a background service and the user interface is just a monitor application that doesn’t have to run. You don’t have to be logged on either for backups to run.
Using the Free Hyper-V Server 2019 Operating System on USB 3.0
If you use the Hyper-V Server 2019 (or older versions) to create a bootable USB recovery stick, there is one additional step necessary after finishing the Rufus installation process. You need to open the Registry Editor and click on “HKEY_LOCAL_MACHINE”. From the main menu click File and Load Hive.
Then navigate to the stick’s file system and select the file X:\Windows\System32\Config\System, where X: is the example drive letter of the USB stick or drive you are using. The registry editor will then ask for a name for a new key to load the hive to. In our example below we used “testttt”:
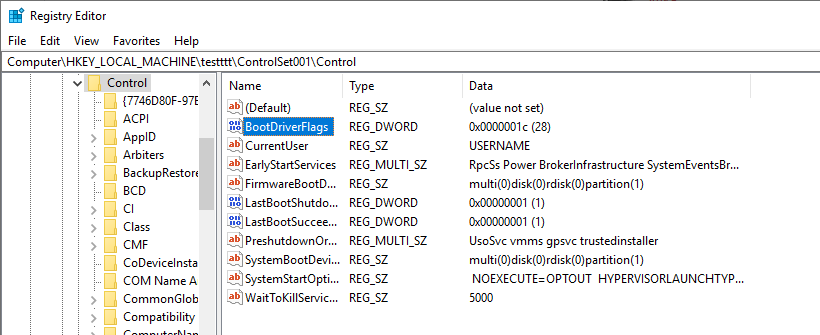
Then open the newly created node ‘testttt’ and navigate to ControlSet001 then Control and set BootConfigFlags to 1c as shown above. Repeat the steps in ControlSet002. Then go back to the node ‘testttt’ and select unload hive from the main menu.
The change is necessary to configure Hyper-V Server to boot from USB and load the drivers at boot time.
Once booted, the Windows installation will finish as usual and ask for a admin password.
Important Changes With Windows Server 2019 Version 1809 and Later
Note, this section does not apply to Windows Server 2022 or Windows Server 2025. Newer versions of Windows Server 2019 beginning with version 1809 appear to be crashing at USB boot with a blue screen.
To get the boot process to work properly from USB, you need to do the following.
- Proceed as outlined above. When the USB disk (or stick) is fully prepared, open the folder X:\Windows\System32\Drivers, where X: is the USB drive
- Rename the file uaspstor.sys to uaspstor.sys.bak. To do this you will need to first take ownership of the file and then configure your Windows user to have full control over the file. To do this, right click on the file and select properties, then go to the security tab. Use the advanced button to change the owner to your own Windows user. Then use the edit button to add your Windows user and grant it full control over the file.
- Take the file usbstor.sys and copy and paste it. Rename the copy to uaspstor.sys. Now we basically replaced uaspstor.sys with usbstor.sys
- Reboot and boot from USB.
Hints
Some USB to SATA adapters, some USB sticks, and some USB external drives will not work for USB boot. Especially 2.5″ adapters without power supply appear to be very unreliable. Adapters with power supply and a 512 byte sector size (no 4KB sector size simulation) work well for USB boot purposes.
You could prepare your backup drive as described above so that the same disk can boot Windows and also contains your disk image backup. In case of a recovery, the bootable USB disk will also have the disk image on it to recover from. You would then install BackupChain, create a new disk backup task, select the disk image file and the target disk and you are ready to go.
As always, please feel free to contact us with questions, suggestions, and comments.
How Well Does this Work?
…really well:

After upgrading BackupChain, Gary tried our disk imaging and bare-metal recovery features. He created a portable, bootable USB stick with Windows Server and BackupChain on it:
“What a fantastic product – BackupChain on a stick! We did it and it works as advertised with no issues, our server booted up perfectly!”
Gary Fleming, DP Technical Analyst, State of CT, Department of Education, 85+ Enterprise Servers with BackupChain installed.
Backup Software Overview
The Best Backup Software in 2026 Download BackupChain®BackupChain is the all-in-one server backup software for:
Server Backup
Disk Image Backup
Drive Cloning and Disk Copy
VirtualBox Backup
VMware Backup
Image Backup
FTP Backup
Cloud Backup
File Server Backup
Virtual Machine Backup
BackupChain Server Backup Solution
Hyper-V Backup
Popular
- Best Practices for Server Backups
- NAS Backup: Buffalo, Drobo, Synology
- How to use BackupChain for Cloud and Remote
- DriveMaker: Map FTP, SFTP, S3 Sites to a Drive Letter (Freeware)
Resources
- BackupChain
- VM Backup
- V4 Articles
- Knowledge Base
- FAQ
- BackupChain (German)
- German Help Pages
- BackupChain (Greek)
- BackupChain (Spanish)
- BackupChain (French)
- BackupChain (Dutch)
- BackupChain (Italian)
- Backup.education
- Sitemap
- BackupChain is an all-in-one, reliable backup solution for Windows and Hyper-V that is more affordable than Veeam, Acronis, and Altaro.
Other Backup How-To Guides
- How to Map SSH / SFTP as a Network Drive in Windows
- Backup Software Without Compression Option: As-Is File Backup
- How to Fix Error 64 “The specified network name is no longer available”
- How to backup VirtualBox VM While Running, Step-by-Step Video
- How to Backup VHD, VHDX while Running
- V2V Converter & Backup for Hyper-V VMware VirtualBox
- Best Practices for Server Backup, Data Backup, and Hyper-V Backup
- List of 12 Virtual Backup Software Vendors
- How to Rollout Windows Updates Without Internet Connection
- Copy VHD / VHDX to Disk or Network With Optional Compression Deduplication
- Why You Need To Defragment Your Backup Drives
- How to Easily Protect Your Servers Against Ransomware
- Alternative to Amazon S3, Glacier, Azure, OpenStack, Google Cloud Drive
- BackupChain is American Backup Software, 100% Made in USA
- How to Clone a System Hard Disk, SSD, or RAID to Another Disk
- Video Step-by-Step Restore VM from Hyper-V Backup on Windows Server 2025 and Windows 11
- How to Fix: The semaphore timeout period has expired, Error 121
- How to Check Hard Disk Health Without Downtime
- How to backup VMware VMs, Step-by-Step Video
- What You Need to Know About Servers